Skip to main content
Owens Corning
Duration®
Series Shingles
Duration®
Designer Color Collection
new
Oakridge®
Shingles
2026 Shingle Color of the Year
new
All Shingles
Ratings & Reviews
new
Hip and Ridge Shingles
Starter Shingles
Ice and Water Barrier
Synthetic Underlayment
Intake Ventilation
Exhaust Ventilation
Low Slope Products
Titanium®
RhinoRoof®
All Components
Trumbull®
Asphalt
PINKWRAP®
Weather Resistant Barrier
SureNail®
Technology
Nailing Zone Performance
StreakGuard®
Algae Protection
Cool Roof Energy Performance
Solar
PROtect™
Program
FORTIFIED
Roof™
Program
new
RoofSmarter™
: Roofing Education & Guidance
RoofGawking™
: Roof Inspiration
Find Your Roof Color
Order a Shingle Color Poster
Financing Your Roof
Design Your Roof Like a Pro
Questions to Ask Your Roofing Contractor
Find a Contractor
Build Your
Roof®
: Roofing System Designer
Design
EyeQ®
: Roof Color Visualizer
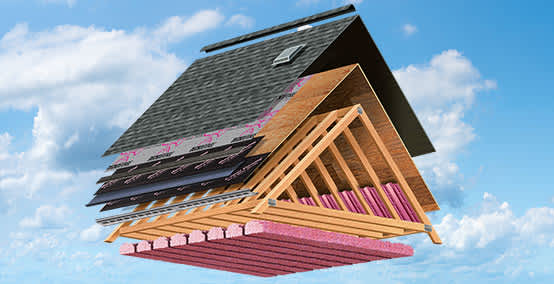
Anatomy of a Roof
Reasons for a New Roof
Roof Replacement vs. Roof Repair
ROOF-A-
Q™
: Frequently Asked Questions
All Roofing Articles
new
new
Roofing Warranties
FAQ
Documents
Standard Warranty Registration
Warranty Transfer
Warranty Claims
Roof Damage
Roof Maintenance
Roof Repairs
All Roofing Care Articles
Member Resources
Owens Corning Roofing Contractor Network
Contractor Events & Education
VR Training
new
PANTERA PROS: Latino Contractor Community
new
Document Library
Install Instructions
Nailing Zone Performance
Roofing Suppliers Near You - Where to Buy
Ventilation Calculator
Business & Technology Solutions
Website Tools
Tech Stack of Tools
Company
Sustainability
Call 1-800-
GETPINK®
Shingle Recycling
Roofing Designer, Sports, and TV Brand Partnerships
Our Brand Promise
Owens Corning
Hamburger Menu
Back
Back
Back
new
new
Back
Back
Back
Back
Roofing
Install Instructions